Final Project and summary of course experience.
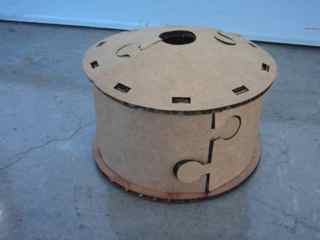
The portable electric handpsinning machine.
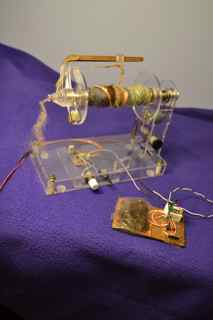
This machine uses the centuries-old technology employed in spinning wheels, but is powered by a DC power supply that runs a small DC motor. Speed and direction of turning are controlled by switches on the spinner base, and the motor is started by pressing a footswitch. The spinner fits within a space of 8"x8"x4"
What has been done before?
In the past few years several electric spinning wheels have appeared on the market. Some are shown below, including the Roberta Spinner, which has been around ~ 10 years. These machines are are purchased by hand-spinners, amateur and professional, who traditionally would use foot-treadled wheels. They have several attractive features:
- Small size makes them portable for travel and easy storage.
- Widely variable speed makes them versatile.
- Speed controlled motor means that the brain can concentrate on contoll of the spinning process. Good for beginners?
- Spinners can avoid repetitive stress injuries due to treadling.
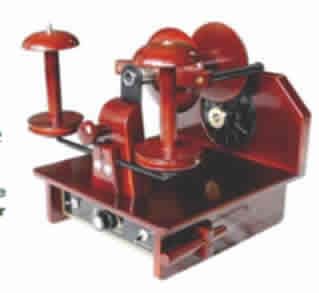
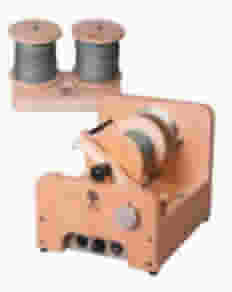
The HansenCrafts Spinner costs ~$800-900 ___________________The Roberta Spinner costs ~$1200_________The Ashford Spinner at ~$750
The cost, on the order of ~1k$, is probably not prohibitive for the developed-world craft person, but a machine that costs ~$100 could be attractive for
- Those not ready to to fork out $1000 to start on a craft.
- DIYers.
- People that make their living by spinning in traditional cultures.
- People like me who would love to invite a roomful of people to learn to spin on a bunch of battery-powered machines.
What I did.
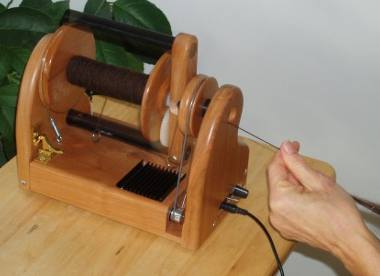
My earlier prototype:
I made and used this prototype last year using standard machining tools and a brushless DC motor with a commercial control board (replacement cost ~ $300). Speed control is cumbersome - depends on choosing the correct input voltage or using a variable power supply. I hoped to make it:
- Controlled speed, DC power source.
- Easy to make multiple copies.
- Cheaper. Start with simple DC motor, find out if higher performance is needed.
- More compact.
- Battery powered.
- Nicer looking.
- Smoother path for fiber.
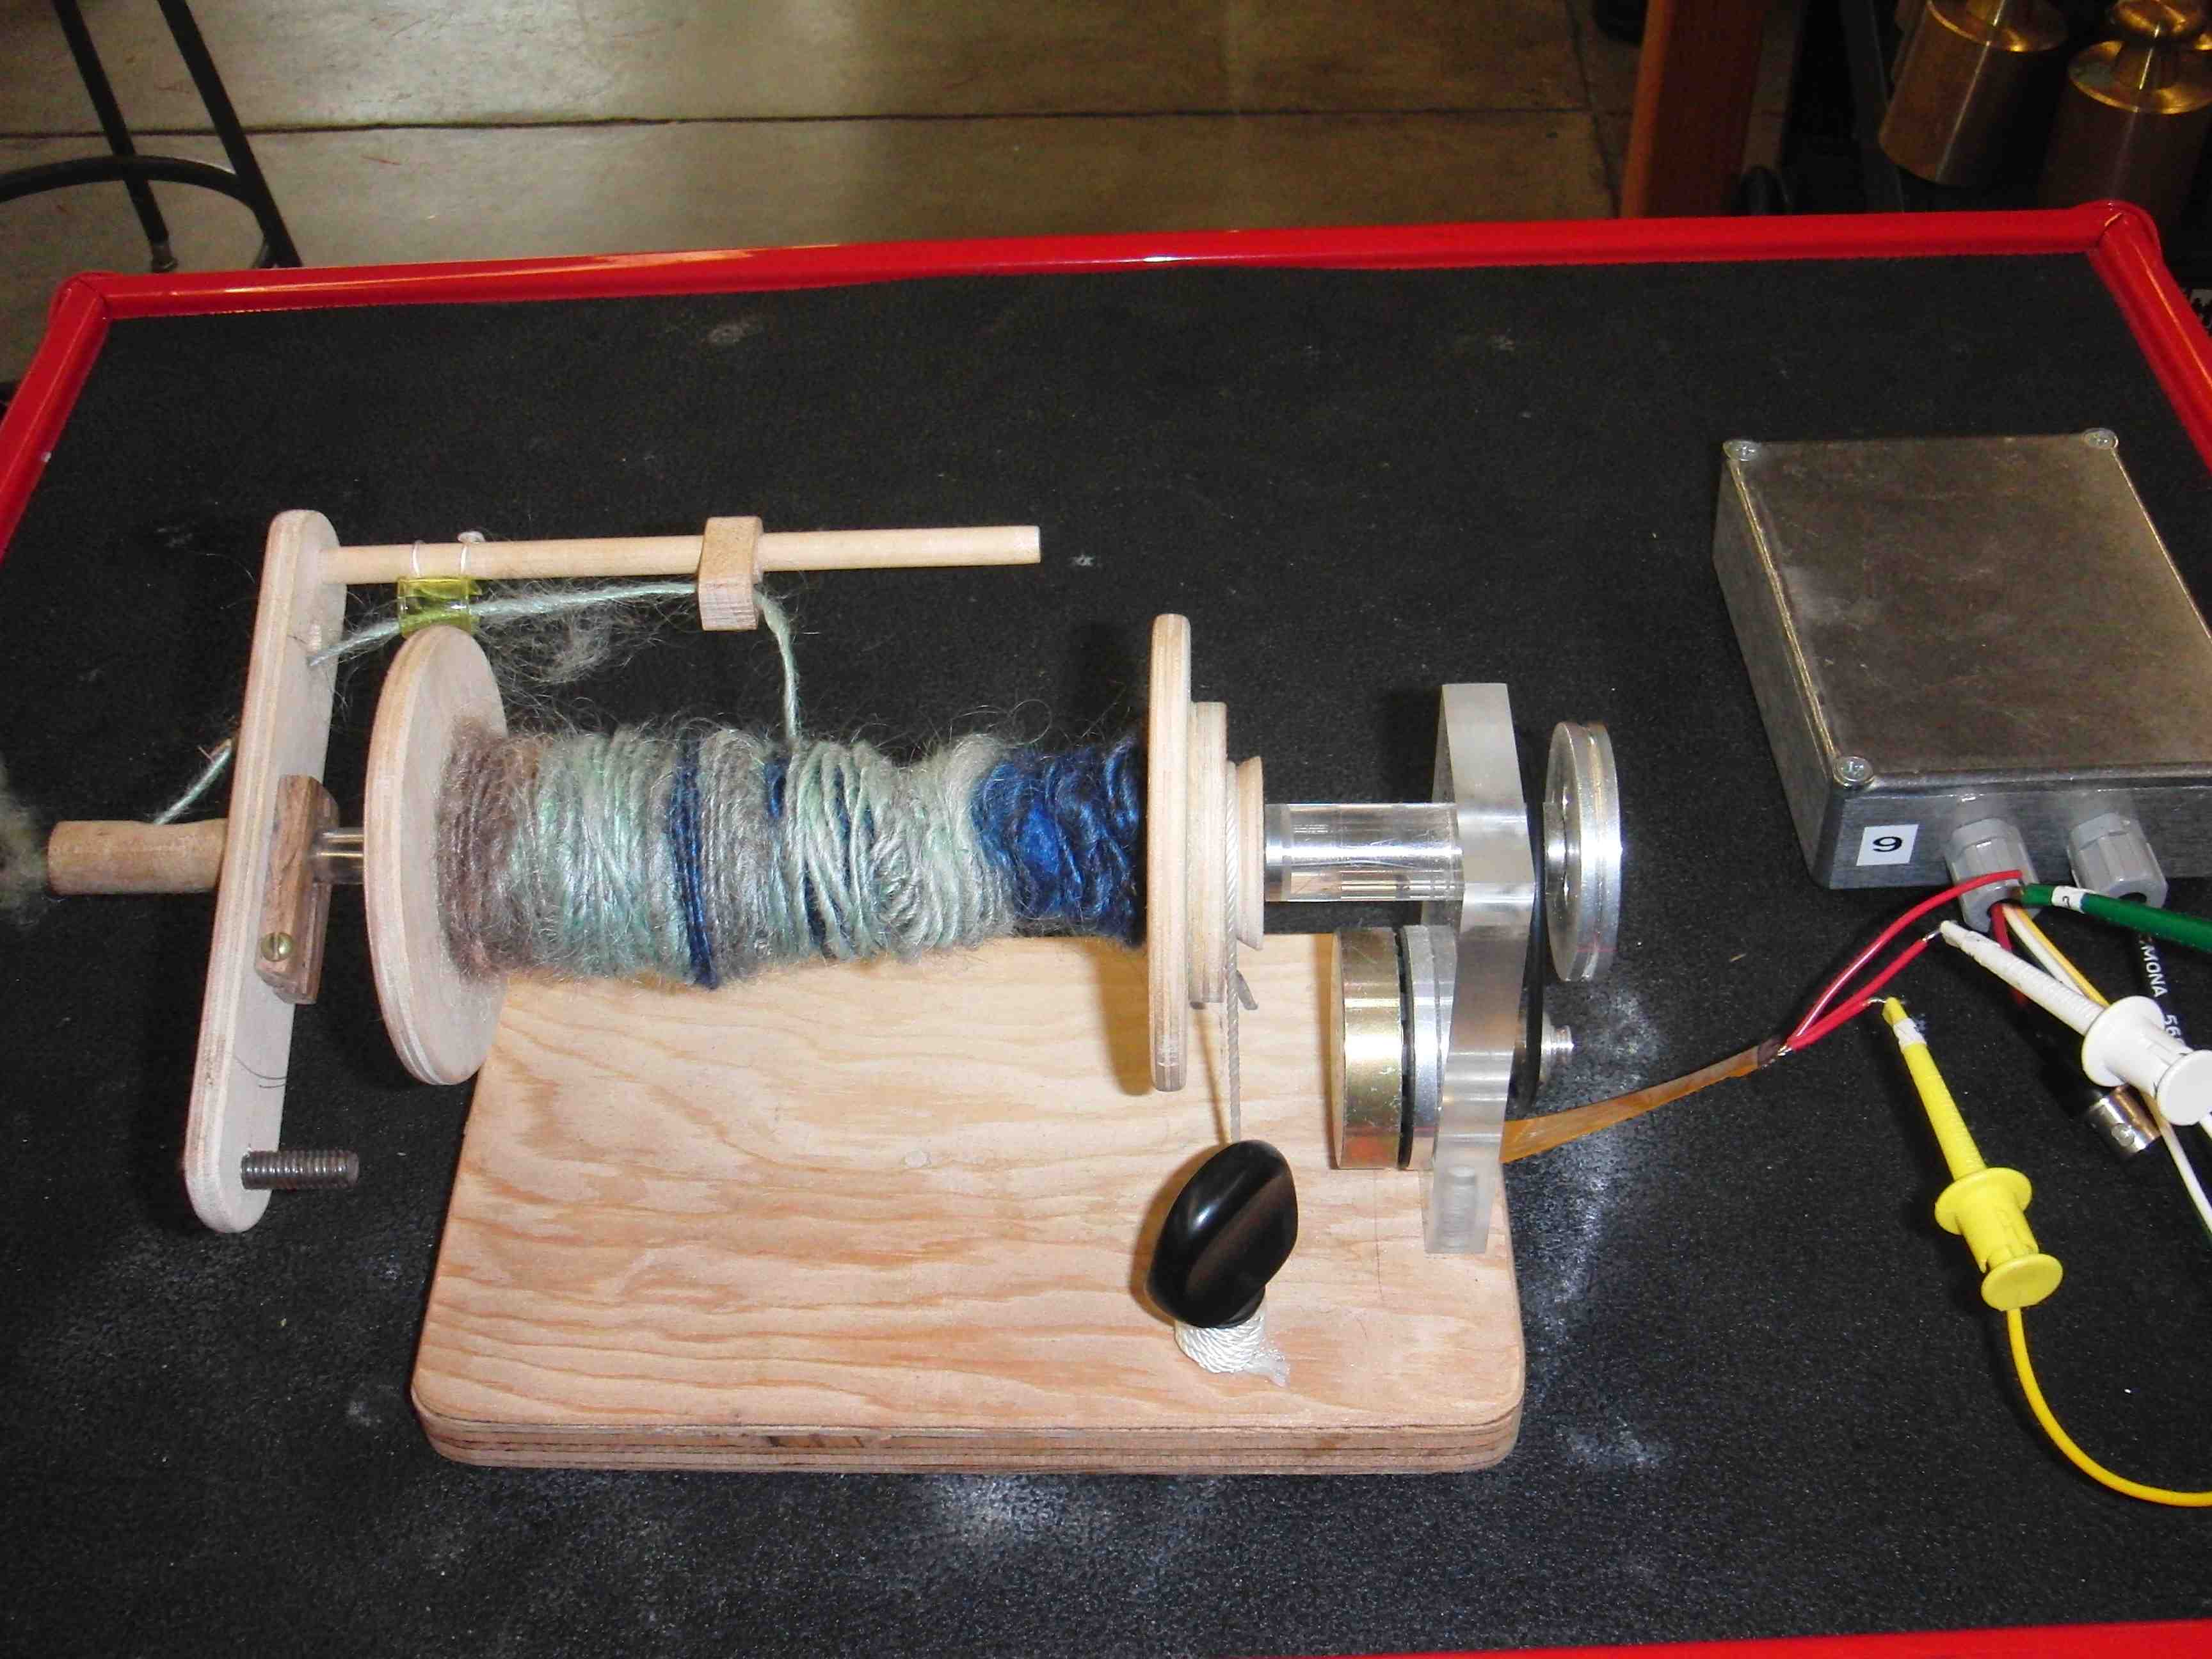
The table lists subcomponents, materials, methods, and approximate costs of the Final Project spinner.
| Component |
Method Used |
Materials |
Cost |
Files. |
| Parts of machine and spindles. |
2D cutting, mechanical design
|
Acrylic, purchased
Bearings, found
Shaft, scrap/ hardware
Bobbin: Brass or Acrylic. |
10
10
2/4
4 for brass. 1 for acrylic. |
Solidworks file for 2D parts:AcrylicParts03.SLDPRT |
| Flyer |
Composites, 2D cutting. |
Acrylic
Composite |
5
0 |
Solidworks file for Flyer, inlet, and hook parts:Flyer01.SLDPRT,Inlet.SLDPRT,hook.SLDPRT |
| Motor. |
|
Motor
Belt
|
2
0
|
|
| Motor control board. |
Embedded prog, input, output.
3D printing |
Circuit board
Knobs |
~5
~1 |
Eagle files for board: DC_motor.brd DC_motor.sch
Arduino code for motor control: DC_motor_Tiny45_an_in_dec9.ino |
Foot switch. Use wool/steel composite sensor. |
Sensor, communication (of the simplest kind). |
Circuit board
Battery Holder
Wool/Steel composite |
~5
~1
0 |
Eagle files for board: proximity.brd,proximity.sch.
Arduino code for sensor board:Button_Rob.ino |
The total cost of parts is ~$45 for this model. If wood, cardboard, or other fiber products were used, the bearings and boards would be the largest cost. May be worth trying a lower-tech bearing. Then cost could be under $20.
Some pictures and details of subsystems.
Body, motor support, and bearings.
- All parts of the body are made from 0.122" (3mm) acrylic. Could just as well be wood.
- Bearing-holding cylinder was turned on a lathe to accept bearings.
- Bearings were found in the stockpile. Similar bearings are ~$5-$10.
- Drive is accomplished by an oring (1/16" cross-section diameter) and a pair of pulleys with diameter ratio of about five. Pulleys are made form acrylic (big) and aluminum (small).
- Parts fit together with press fit. Added some screws.
- The flyer fits onto the shaft and is driven directly. The bobbin is loose on the shaft, and is driven by the torque applied by the yarn as the flyer rotates.
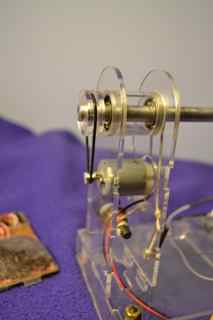
Tensioning mechanism.
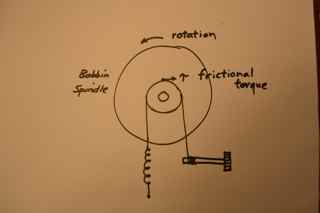
This is the mechanism that applies a frictional torque to the bobbin. A string wraps around a groove in a pulley on one end of the bobbin. As the tension in this string increases, the friction between the string and pulley increases. This friction acting through the radius of the pulley creates a torque on the bobbin. This torque is opposed to the torqe exterted on the bobbin by the tension in the yarn being wound on. The relative motion of the flyer and the bobbin is determined by the greater of the two torques. If the yarn tension provides greater torque, the bobbin moves with the flyer, and the yarn does not advance, but is twisted. It the yarn tension provides a smaller torque, the frictional torque slows down the bobbin, and the relative motion of the flyer and bobbin causes the yarn to wind onto the bobbin. Yes, this actually works.
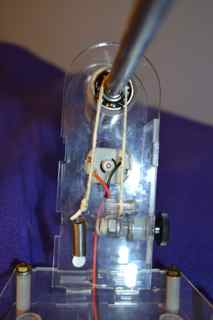
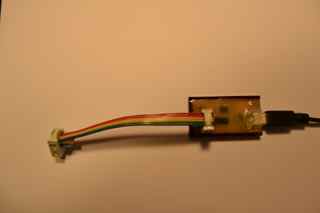
Motor control board.
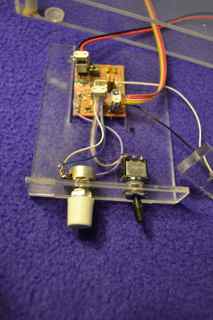
- This is the motor control board from output week that uses the 4953 h-bridge driver with a software PWM on the Tiny45 chip. The original board is modified so that it:
- Reads an analog in voltage on the 10k potentiometer (spanning 0 to regulated 5V). This is converted to a PWM duty cycle in software.
- Determines direction from a digital in pin with pullup resistor, connected to the switch.
- Determines whether or not to run by reading the state of another input pin connected to an external signal.
Shaft and flyer.
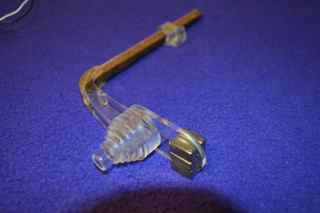
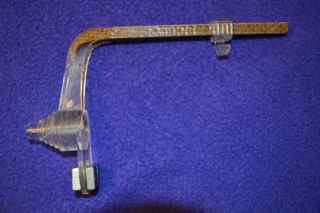
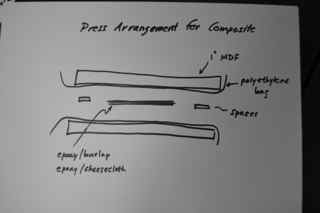
- The arm of the flyer, best seen in the middle picture above, is made from two inner layers of burlap/epoxy composite, which extend over the bobbin, and two layers of 3mm acrylic. The composite is pressed between MDF panels, with spacers to set the thickness. This is shown in a sketch above, and in the photgraphs on the Final project development page. Please see that page for details on this composite-making method.
- A sliding hook for yarn distribution is made of four layers of 3mm acrylic, joined with methylene choloride.
- The inlet is a stack of acrylic discs, with cutouts for the flyer arm. All acrylic is joined with methylene chloride.
- The magnets on the acrylic piece opposite tht flyer arm provide adjustable static balance. The flyer is not dynamically balanced - asymmetry means that there is a net torque perpendicular to the shaft as it rotates. This may lead to problems. In future iterations I may want to make it symmetric, like some other traditional designs.
Bobbin.
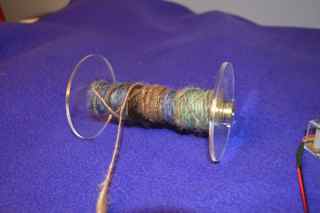
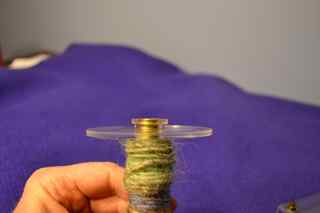
- Made with brass tubing from the hardware store. This is very precisely dimensioned thin-wall brass tubing, for a few $$ per foot. A better choice for cheap construction would be cardboard tube with wood ends.
- Extra two layers of 3mm acrylic added to one end to provide friction surface for the tensioned string.
Footswitch.
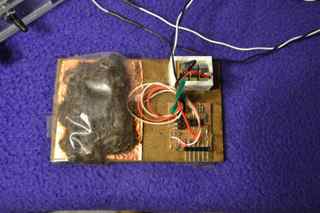
- The footswitch uses a wool-steel fiber composite to sense pressure. The resistance changes by an order of magnitude or so as the pad is pressed against the copper plates, as shown in more detail on the Final project development page. I have used a DC resistance measurement, but find that the operation is not quite reliable as the pad shifts and compresses. This method relies on contact resistance, which is not a very stable quantity. It will be better to use the capacitance, and to implement the transmit/receive method used in Neil's examples. The capacitance of the composite conductor/insulator whould be more robust, and change in a more predictable (and perhaps larger) way with pressure.
- The footswitch board comes from the input week. In the current configuration it is not needed - the DC voltage signal could be generated from the main motor driver board. However, the intent was and is to make a wireless link between the footswitch and the motor board.
Results, observations and questions.
It works. Footswitch seems to be a good solution, since it gives good control of starting and stopping - good at this point of my spinning skill development. As I get more skilled, I may want it to work in a mode such that user does not have to keep foot pressure on. An easy software addition would be to let the foot switch toggle the on/off state. It is now time to use this machine to learn to spin. Questions will include:
- Do I need speed control rather than the combination of speed and torque that I control by PWM?
- Do I need to make a symmetric flyer?
- How does the yarn-feeding mechansm work?
- How does the friction mechanism work? Is there a better way?
There are many more things that can be done. The list in the table on the Final project development page is still there.
Course highlights.
Weeks. My list of weekly projects includes much unfinished business and inspirations for future work, in addition to some concrete accomplishments.
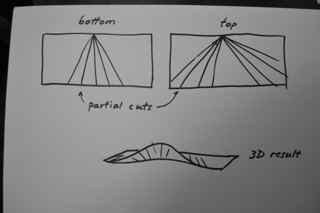
- 2d shapes. My favorite set of learning involves using 2D patterning to fill up 3D space, using flexures, slots, and partial cuts.
- Cutting slits in cardboard to allow bending. Cutting sets of lines at angles can make 3D curves.
- I was able to make my own svg files by printing lines of text. This is worth revisiting, and could be a useful tutorial.
- Circuitboard making in week 3 was a topic that I neglected in documentation, but a crucial one in the long haul:.
- It turns out that the ability to mill and populate a board with fast turnaround is crucial to the success of all the embedded programming weeks. This is worth practicing until one is able reliably to make a board in which the chip can be programmed as-built. The fast turnaround is a benefit of the milling technique.
- Here is my TinyISP board made in that week. I still have limited understanding of what is does and how it does it, but can revisit that now that I have a better understaning of AVR programming and the C language. The board itself survived a couple of surgeries, and since it was still functioning after that, was encased in epoxy, and has been the programmer used all semester.
- Over the semester I became more adept at modifying and adding to boards (perhaps to a fault). Both of my final project boards are recycled from weekly work.
- 3D scanning and printing also opened up some interesting areas.
- Molding and casting was great fun.
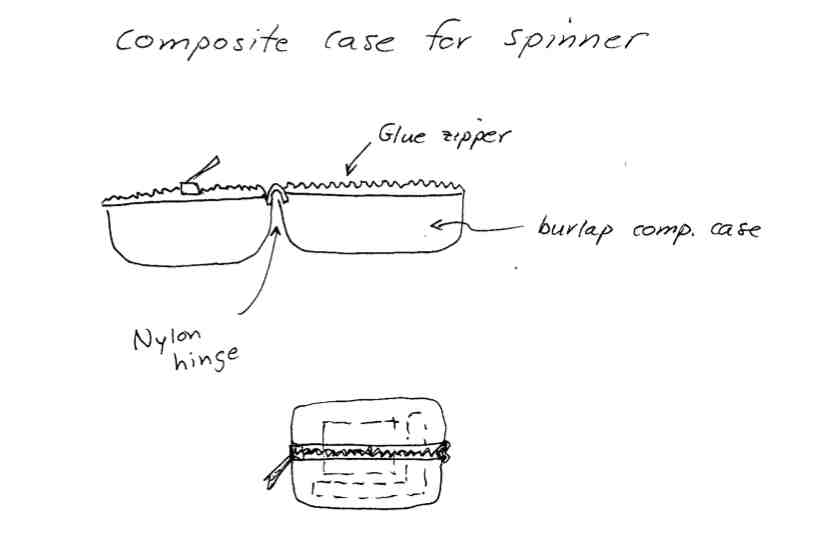
- Composites. The GreatStuff composite mold did not work well, and may not be a good idea due to the fact that Great Stuff expands unpredictably and is too soft to clamp without distortion. I would like to pursue the idea of a case, perhaps gluing a fabric hinge and a zipper as a closure between the two parts, as sketched below.
- Capacitance. Step response and tx/rx. This seems like a powerful tool that I want to explore. I will get some examples working and write a tutorial based on my experience and class experience. The aim will be to reduce the barriers to using this method by:
- Python/AVR examples from Neil will be a starting point for me to study and modify to make useful projects to incorporate into my teaching.
Ideas. Several ideas showed up through the semester and will remain with me in one form or another:
- free software/ open source software.
- parametric design.
- Control at lowest level. Scripting, assembly, functional representations.
- 2D to make 3D.
- Fabrication in context of human learning and empowerment and ......
- Putting more functions in embedded software and microcontroller hardware, rather than component hardware.
Thanks to students, TA's, colleagues all over, and to Neil!